Demo and future features
Demo: eight starting settlers, three Survival days, unlimited Sandbox. This reference also covers systems beyond the demo. Check release scope.
Creative Tools🔗
Use the Builder’s larger tools to reshape terrain, extend structures, capture a build as a blueprint, and share it through the Steam Workshop.
Creative tools can change many blocks at once. Save before a large edit, keep the whole preview in view, and use a small first pass when learning a tool.
Choose the right mode🔗
The buttons on the left change what the Builder is doing:
| Mode | Use it for |
|---|---|
| Remove | Delete terrain, structures, or decorations from the selected area. |
| Build | Shape Terrain or place Structure pieces. |
| Decorate | Place Nature, Production, Decor, and Entity entries. |
| Blueprints | Create a reusable build or place one from the Blueprint Library. |
Tool buttons are contextual. A disabled button is not available for the current shape, selection, or mode.
Shape terrain🔗
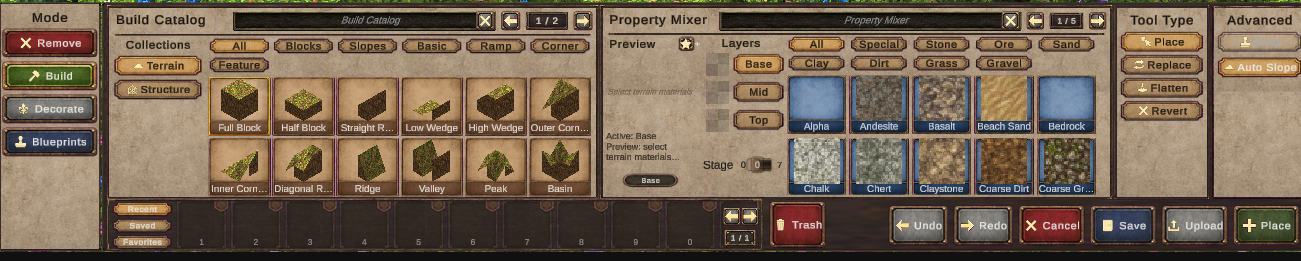
Choose Build → Terrain, then select a terrain shape. The catalog includes full and half blocks, slopes, ramps, corners, ridges, valleys, peaks, basins, and other forms. Filters such as Blocks, Slopes, Basic, Ramp, and Corner narrow the catalog.
Use the Property Mixer to choose the material layers supported by the shape:
- Base controls the lower or main material;
- Mid controls the middle layer;
- Top controls the visible surface layer.
Terrain tool types🔗
| Tool | What it does |
|---|---|
| Place | Adds the selected terrain shape and material mix. |
| Replace | Changes existing terrain to the selected shape or materials. |
| Flatten | Brings the target area to the chosen height. |
| Revert | Restores terrain through the active revert preview. |
| Auto Slope | Adds supported transitions between different terrain heights. |
Use Undo and Redo while shaping. Cancel clears the active preview without applying it.
A useful terrain workflow🔗
- Start with Place or Replace and make one small change.
- Check the result from more than one camera angle.
- Use slopes, corners, or Auto Slope to blend the edge.
- Use Flatten only where a deliberately level area suits the build.
- Revert or undo the pass if it changed more terrain than expected.
Flatten is one option, not the goal. You can carve a hillside home, raise terraces, extend a ridge, form a path, or preserve most of the generated landscape.
Build faster with structure tools🔗

Choose Build → Structure. The catalog groups blocks, windows, openings, walls, slabs, columns, posts, angled pieces, and corners. The Property Mixer can expose Base, Mid, Top, Roof, and Glass layers, depending on the selected shape.
| Tool | Best use |
|---|---|
| Place | Add one selected piece at the preview position. |
| Copy | Repeat the selected piece without rebuilding its setup. |
| Wand | Extend a compatible piece or pattern across the previewed surface. |
| Floor | Fill out supported floor work more quickly. |
| Overhang | Extend supported roof or projecting pieces. |
| Replace | Change an existing piece while keeping its location. |
| Revert | Restore structure pieces through the active revert preview. |
Stamp, Subgrid, and Face Orient provide additional placement control when the current selection supports them:
- Stamp applies the supported selection as a reusable placement action;
- Subgrid allows finer positioning inside the normal grid;
- Face Orient follows the face you are pointing at when orienting the piece.
For multi-piece tools such as Wand or Floor, inspect the entire preview before applying it. Corners, openings, mixed shapes, and a surface changing height can alter the result.
Pick instead of hunting
Middle-click a placed block—or press Q while pointing at it—to select its matching catalog shape and materials immediately.
Create a blueprint🔗
Blueprint Create mode captures a selected volume rather than requiring you to rebuild the design piece by piece.
1. Define the volume🔗
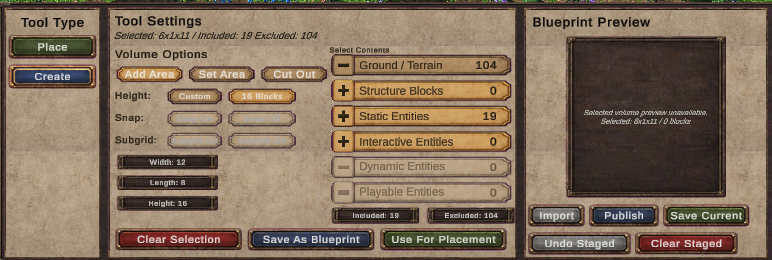
Choose Blueprints → Create, then use:
- Add Area to add another region to the current selection;
- Set Area to replace the current selection with a new region;
- Cut Out to remove an unwanted region from the selection.
Adjust Width, Length, and Height when you need exact bounds. Height presets, custom height, snap, and subgrid controls help fit the volume around the build.
Keep the selection tight. A smaller, deliberate volume produces a blueprint that is easier to preview and place.
2. Choose what it contains🔗
Review the included content before saving:
| Content | Typical use |
|---|---|
| Ground / Terrain | The terrain shaping beneath or around the build. |
| Structure Blocks | Floors, walls, roofs, windows, stairs, and other structure pieces. |
| Static Entities | Non-interactive decorations and placed objects. |
| Interactive Entities | Supported objects with an interaction. |
The selection summary shows what is included and excluded. Dynamic entities and playable entities are visible in the tool but disabled in the current Blueprint Create flow.
Use Clear Selection to start the volume again. Choose Save As Blueprint to keep it in your library, or Use For Placement to move directly into a placement workflow.
Use the Blueprint Library🔗
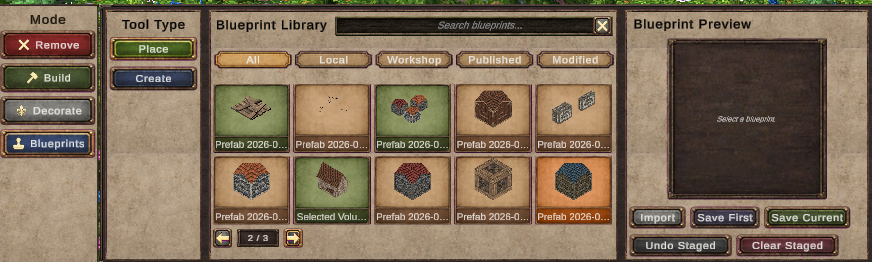
The library separates builds by where they came from and what has happened to them:
| Tab | What you will find |
|---|---|
| All | Every blueprint currently visible to the library. |
| Local | Blueprints saved on this installation. |
| Workshop | Builds available through Steam Workshop. |
| Published | Blueprints you have published. |
| Modified | Library builds with local changes. |
Select a blueprint card to open its preview before importing or placing it. Use the search field when the library becomes crowded.
Publish your build🔗
- Save the selected build as a blueprint.
- Select it and review the Blueprint Preview.
- Give it a name that identifies the build clearly.
- Choose Publish or Upload to send it to Steam Workshop.
- Keep the local version as your editable copy.
Creative Alpha updates can change blueprint compatibility. Keep important builds locally even after publishing them.
Download and place another player’s build🔗
- Choose Blueprints → Place.
- Open the Workshop tab.
- Select a build and inspect its preview.
- Choose Import to add it to your library.
- Preview it in the world, then rotate or adjust the placement.
- Place it when the full preview is where you want it.
Imported blueprints can include terrain, structures, and supported entities. Check how the preview meets the existing ground before placing it.
Manage staged changes🔗
Blueprint tools may stage a selection or placement before it becomes the result you want. Use Undo Staged to step back through staged work and Clear Staged to discard the current staged result.
These controls are separate from the Builder’s general Undo and Redo actions. If a placement is still a preview, cancel or clear it; if it has already been applied, use Undo.
Blueprint sharing is separate from sharing an entire world. See Worlds, Saves & Sharing for save and backup guidance.