Demo and future features
Demo: eight starting settlers, three Survival days, unlimited Sandbox. This reference also covers systems beyond the demo. Check release scope.
Your First Settlement🔗
Give your eight settlers roles, organize the starting encampment, make their first tools, and prepare for the night. Follow the Day 1 guide as your colony gets to work.
The free single-player demo includes three full in-game days of Survival and unlimited building time in Sandbox. This walkthrough follows the Survival opening. Choose Sandbox when you want to experiment with building without a time limit; see Demo & Release Scope for the distinction.
1. Create a Survival world🔗
Start a new Survival world. On the Create World screen:
- Give it a World Name. Change the Global Seed or use Randomize if you want a different world.
- Set your Player Faction Name and choose a Starting Difficulty. Easy is a useful first-session choice; the pictured world is rated Easy starting area.
- Inspect the Starting Area preview. Use Set Spawn if you want to choose a different starting location, or keep the suggested one.
- Choose the green Create World button at the bottom right to begin. Save Server Config is a separate action.
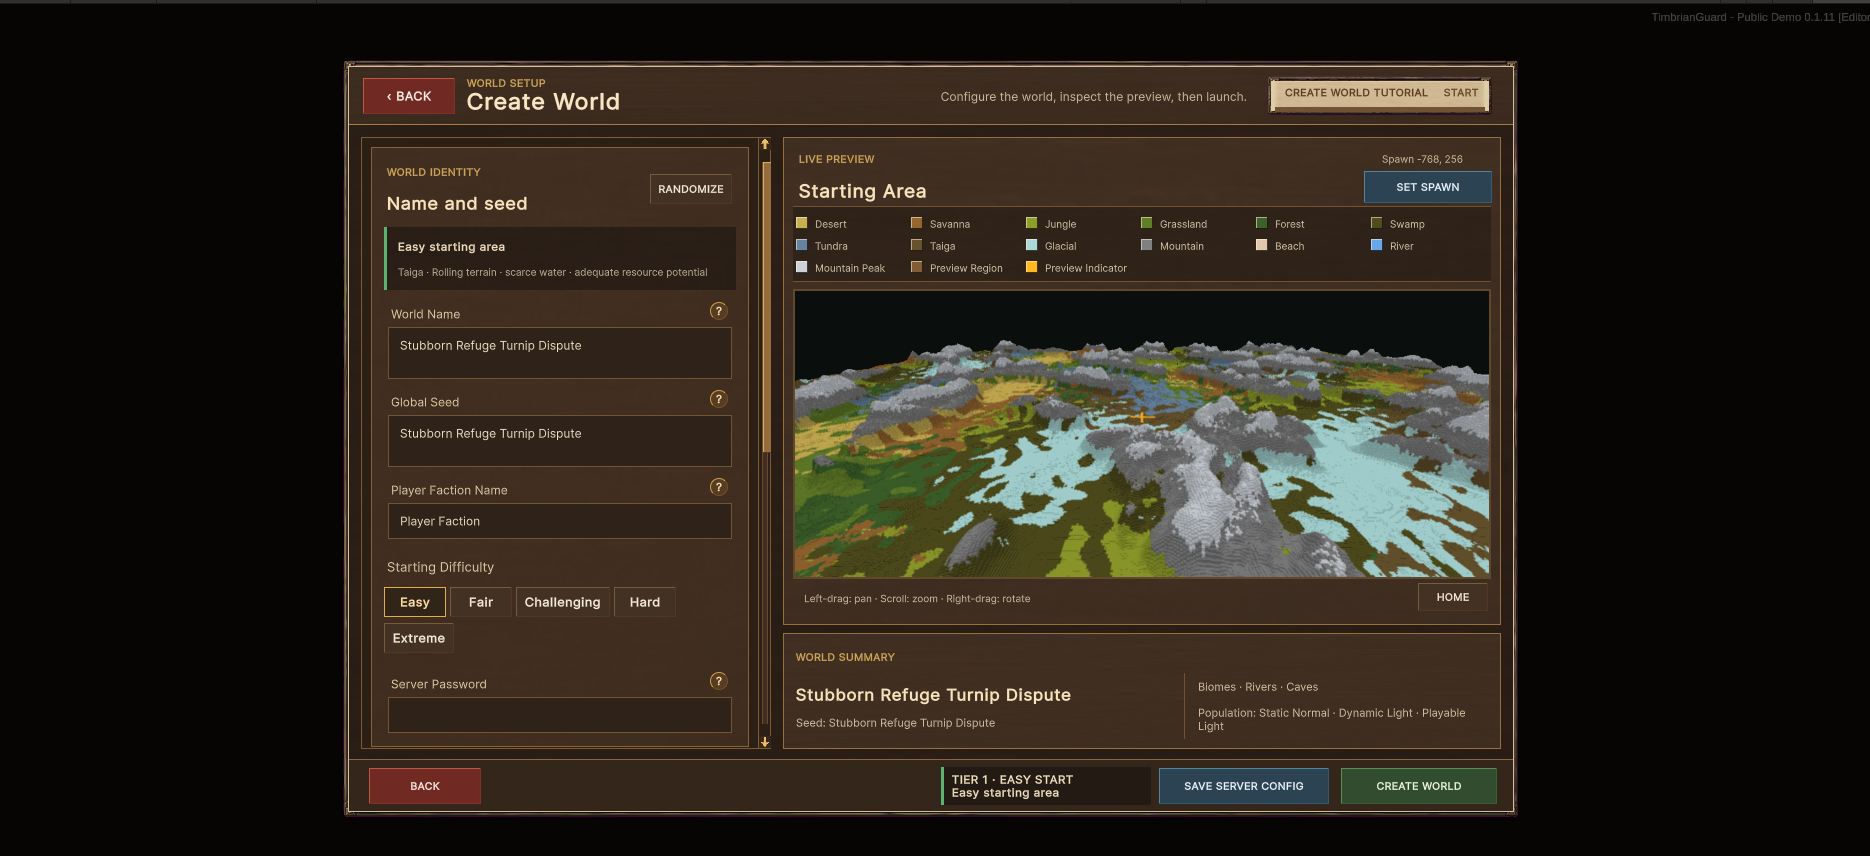
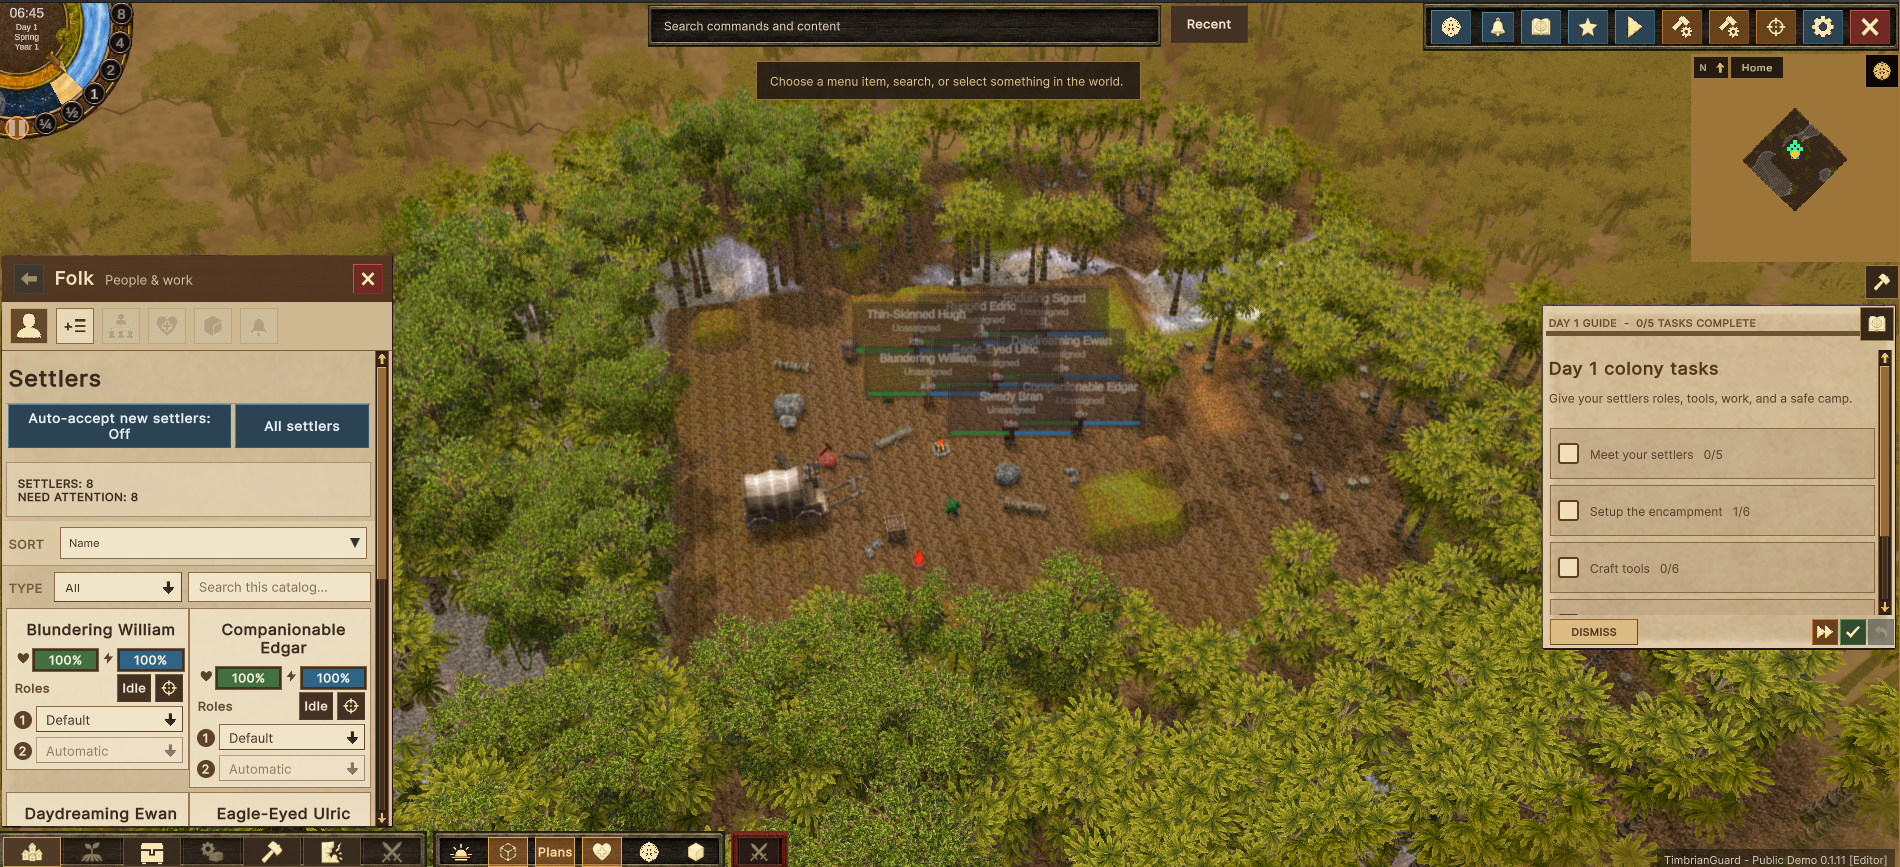
Screenshots in this guide were supplied from Public Demo 0.1.11 [Editor]. Click or tap an image to enlarge it. World names and settler role fits vary between runs.
Once the world loads, find your starting encampment and its eight settlers. Keep the Day 1 guide open: its tasks point you toward the relevant controls. The guide covers meeting your settlers, setting up the encampment, crafting tools, setting work, and preparing defenses.
Get comfortable with the camera and clock🔗
| Action | Default control |
|---|---|
| Move the camera | W A S D or the arrow keys |
| Rotate | Hold the right mouse button |
| Zoom | Mouse wheel |
| Pan | Hold the middle mouse button |
| Pause or resume | Space |
| Change camera view | Tab |
| Slice the view to see through layers | Alt + mouse wheel |
Pause while you look around and plan. Use the clock's 1x speed when you are ready to watch work progress. Custom bindings take priority over these defaults; Controls & Camera covers remapping and the other useful controls.
2. Meet your settlers🔗
Open Folk → Settlers and select All settlers to open the Colony settlers roster. In Primary mode, click a settler's cell under the role you want them to prefer. The roster applies these changes directly; there is no separate Submit step here. You can also use the numbered role dropdowns on individual settler cards.
The percentages and Strong fit / Permissible fit / Poor fit colors help compare settlers. Allowed shows work that a settler may do, not an assigned primary role: a roster showing 8 Default, 0 Preferred still needs your role choices. Check the 1 Primary marker after making a choice. Clicking that same primary again restores Default and clears the secondary preference.
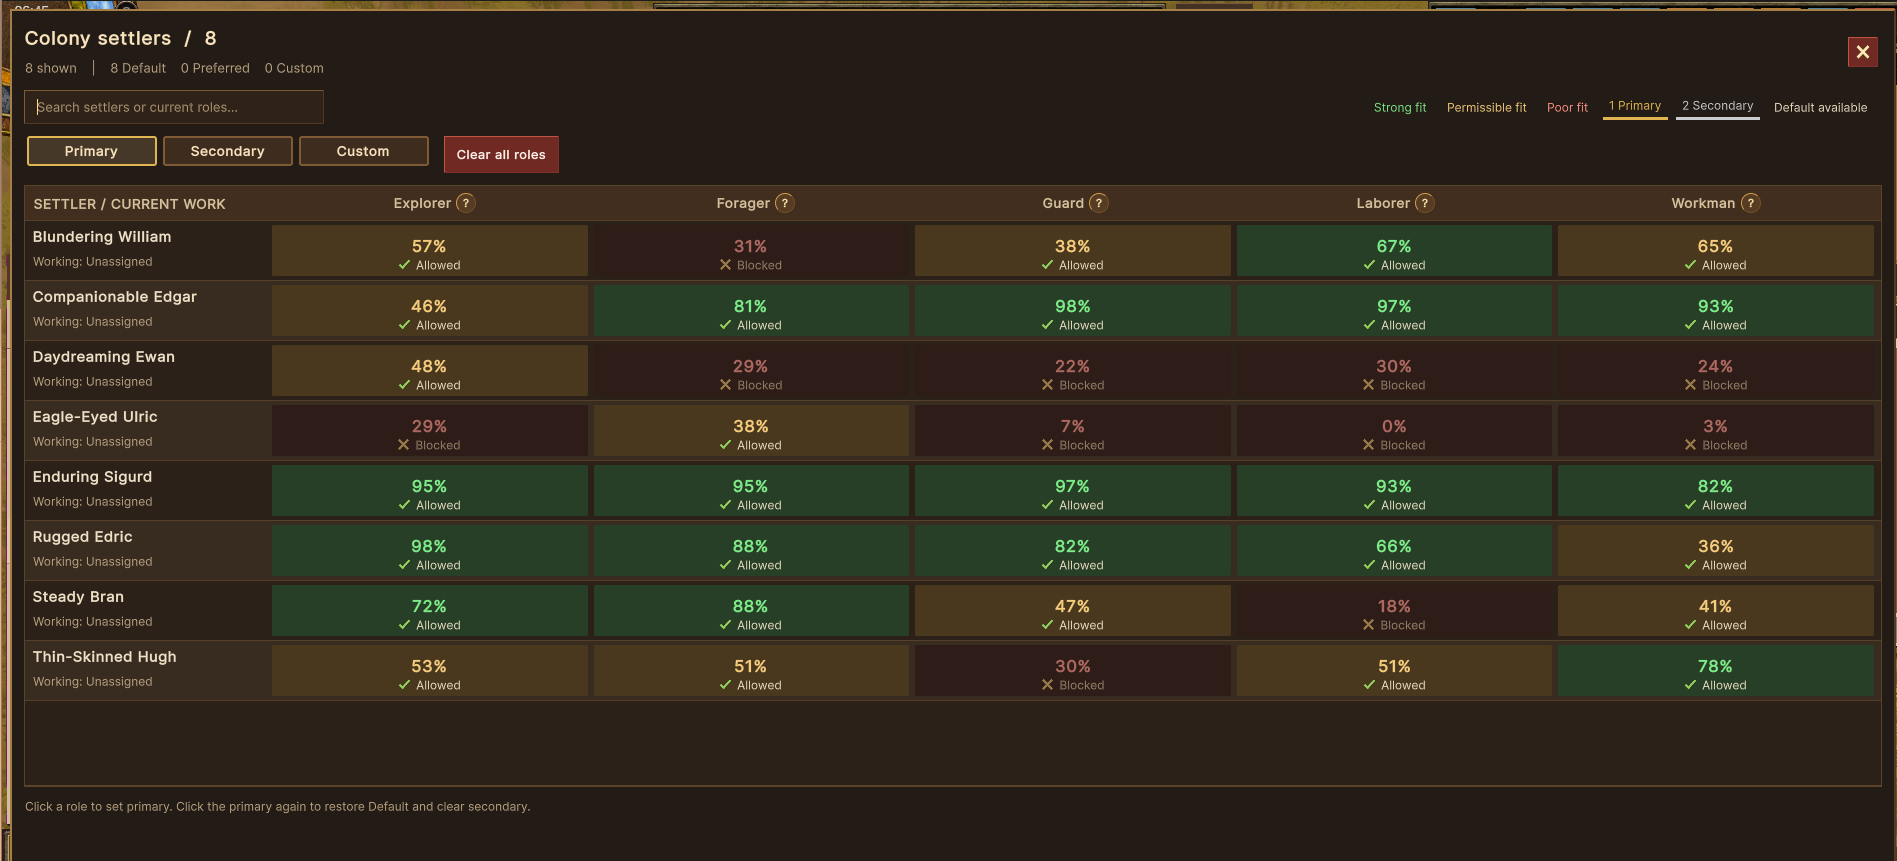
The Day 1 guide asks for this starting arrangement:
| Role | Settlers |
|---|---|
| Forager | 1 |
| Explorer | 2 |
| Guard | 2 |
| Laborer | 2 |
| Workman | 1 |
Check that the assignments appear in the roster and the guide recognizes all five role tasks. You can revisit roles as the colony's needs change. For this first pass, keep the arrangement simple and give all eight settlers a job.
3. Set up the encampment🔗
Clear nearby supplies and give your settlers places to put them:
- Select a nearby fallen log and queue its removal.
- Select a nearby loose stone and queue its collection.
- Open Build → Storage and choose Log Pile, Rock Pile, and Dirt Pile from the resource-pile catalog. Stage them near the encampment, checking each placement preview and submitting it with the active tool's Submit control.
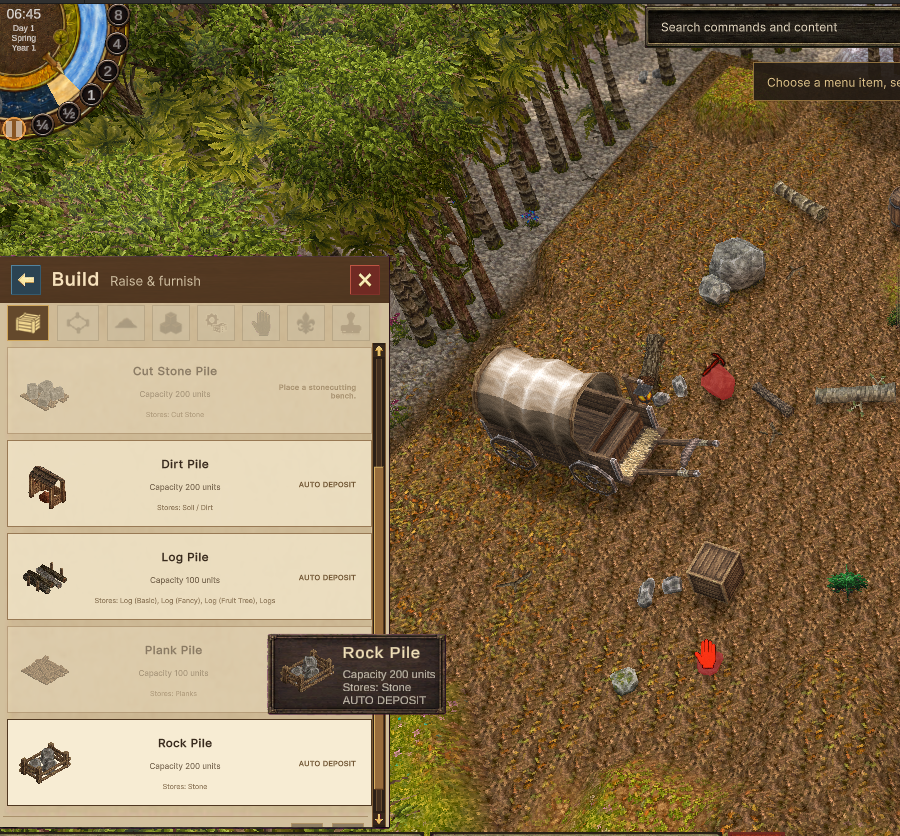
Use Rock Pile for loose stone. Cut Stone Pile stores processed cut stone and is a different entry; it is unavailable in the pictured opening. Auto Deposit on the basic piles describes their deposit behavior, not a separate job assignment.
Leave routes between the piles, the Wagon, and your work sites. Keeping storage close makes it easier to follow gathering and hauling during your first session.
A preview still needs submitting
In Survival, staging a placement and submitting it are separate steps. Follow the active tool's Submit prompt, then check that the order was accepted. Construction plans still need your settlers, materials, and working time.
4. Craft the first tools at the Wagon🔗
Make sure you have a Workman, then select the Wagon near the encampment. In the right-hand Identity & Actions panel, open the production tab (the gears icon). Its list includes these opening tool recipes:
- Pickaxe Level 1
- Wood Axe Level 1
- Hammer Level 1
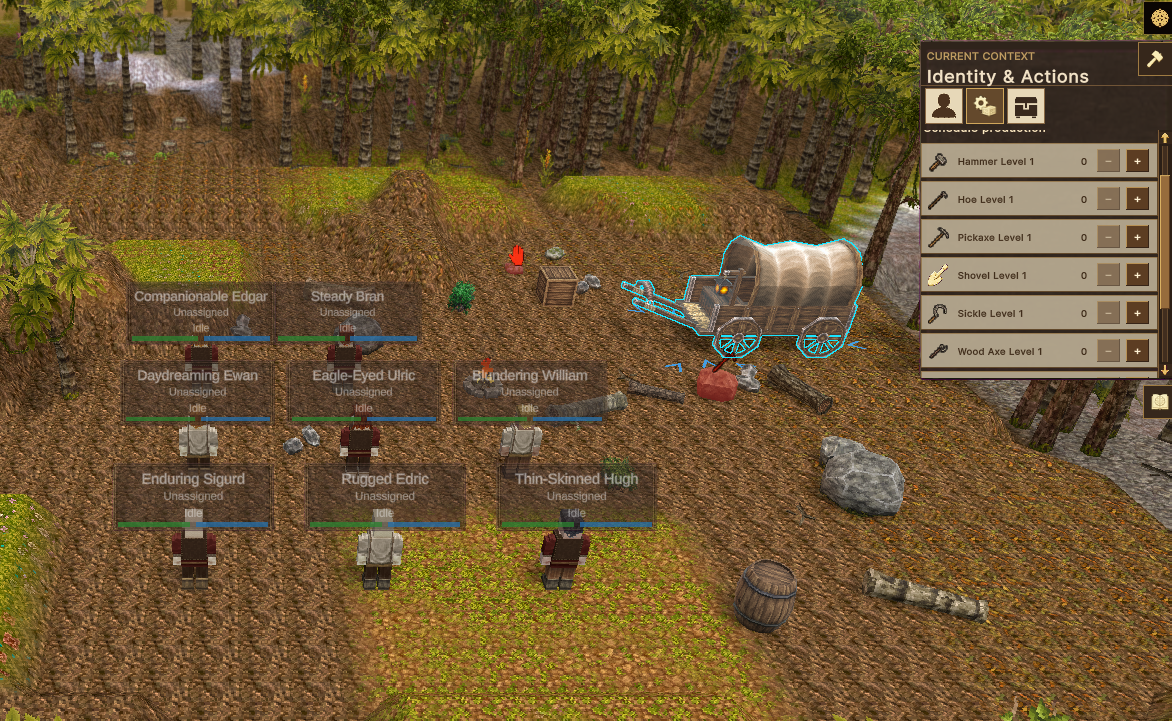
Use the + control beside each requested recipe to queue an order. The visible list also includes Hoe Level 1, Shovel Level 1, and Sickle Level 1. Follow the Craft tools task details in your build for the requested orders; the catalog is broader than the three starter recipes listed above. Let time run and watch the orders progress. If an order stalls, inspect its requirements and blockers before adding more work.
The pictured guide shows six subtasks under Craft tools, so use its task details to check what remains. A checked queueing task does not mean the item has already been crafted, delivered, or equipped.
5. Give the colony work🔗
Use the Day 1 guide to open each task's controls. Start with a manageable amount of work so you can see what the settlers do with each order.
| Work | Where to start | What to do |
|---|---|---|
| Exploration | Map | Select exploration areas and Submit them. |
| Tree cutting | Land → Tree Cutting | Mark nearby trees and submit the work. |
| Excavation | Land → Mine → Entrance | Position and submit a mine entrance as directed by the guide. |
| Foraging | Land → Forage | Mark nearby forage work and submit it. |
After submitting exploration, run the clock at 1x to complete that part of the guide and watch your settlers respond. Check the encampment again as resources arrive: can settlers reach the work, and is there storage for what they collect?
The opening excavation task is not an instruction to begin prospecting or ore mining. Those systems sit beyond the demo's opening scope; follow the demo's guidance and available tools.
6. Prepare for the night🔗
Open Muster and follow the Set defenses tasks:
- Under Training, place a Training Dummy and submit its plan. Allow it to be built.
- With your Guards assigned, select a Training Dummy or Guard and use the training action highlighted by the guide.
- Set up a night patrol using the map instructions below.
- Open Muster's Rally panel (the crossed-swords tab). Under Colony aggressiveness, choose Passive, Neutral, or Aggressive and read the description beneath it. A check mark indicates the selected option.
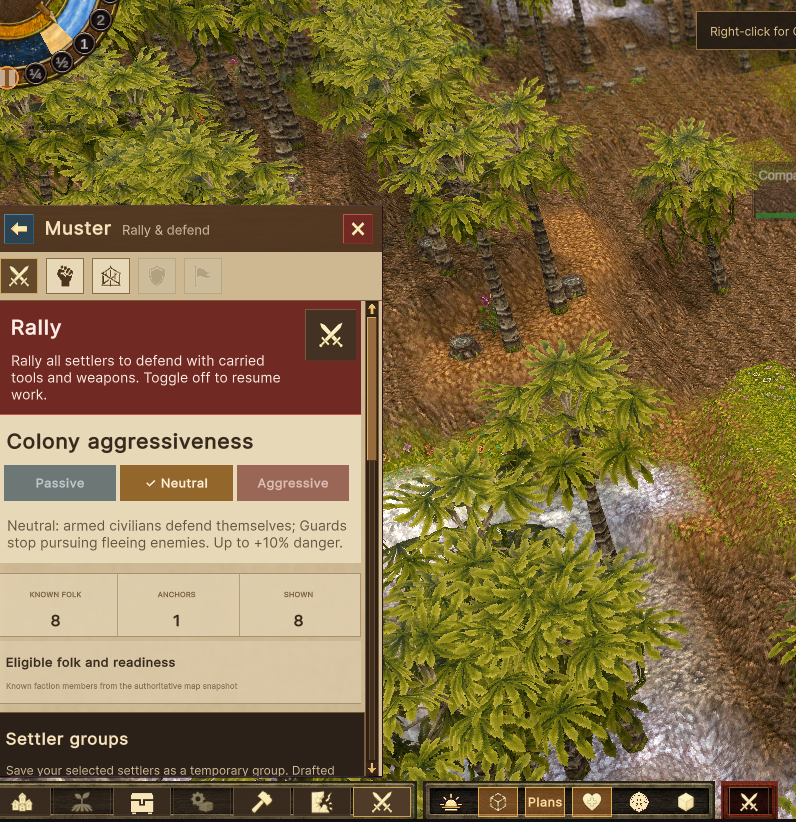
The large Rally control calls settlers to defend with their carried tools and weapons. Toggle it off to let them resume work. Choosing an aggressiveness option is a separate action from rallying everyone.
Submit a night patrol🔗
Use the guide's Place a night patrol marker task to open the World map in Patrol Editing mode. Click discovered land to stage patrol pins around the area you want covered. The pictured route has four numbered pins, and the footer says Night Patrol: 4 pins staged.
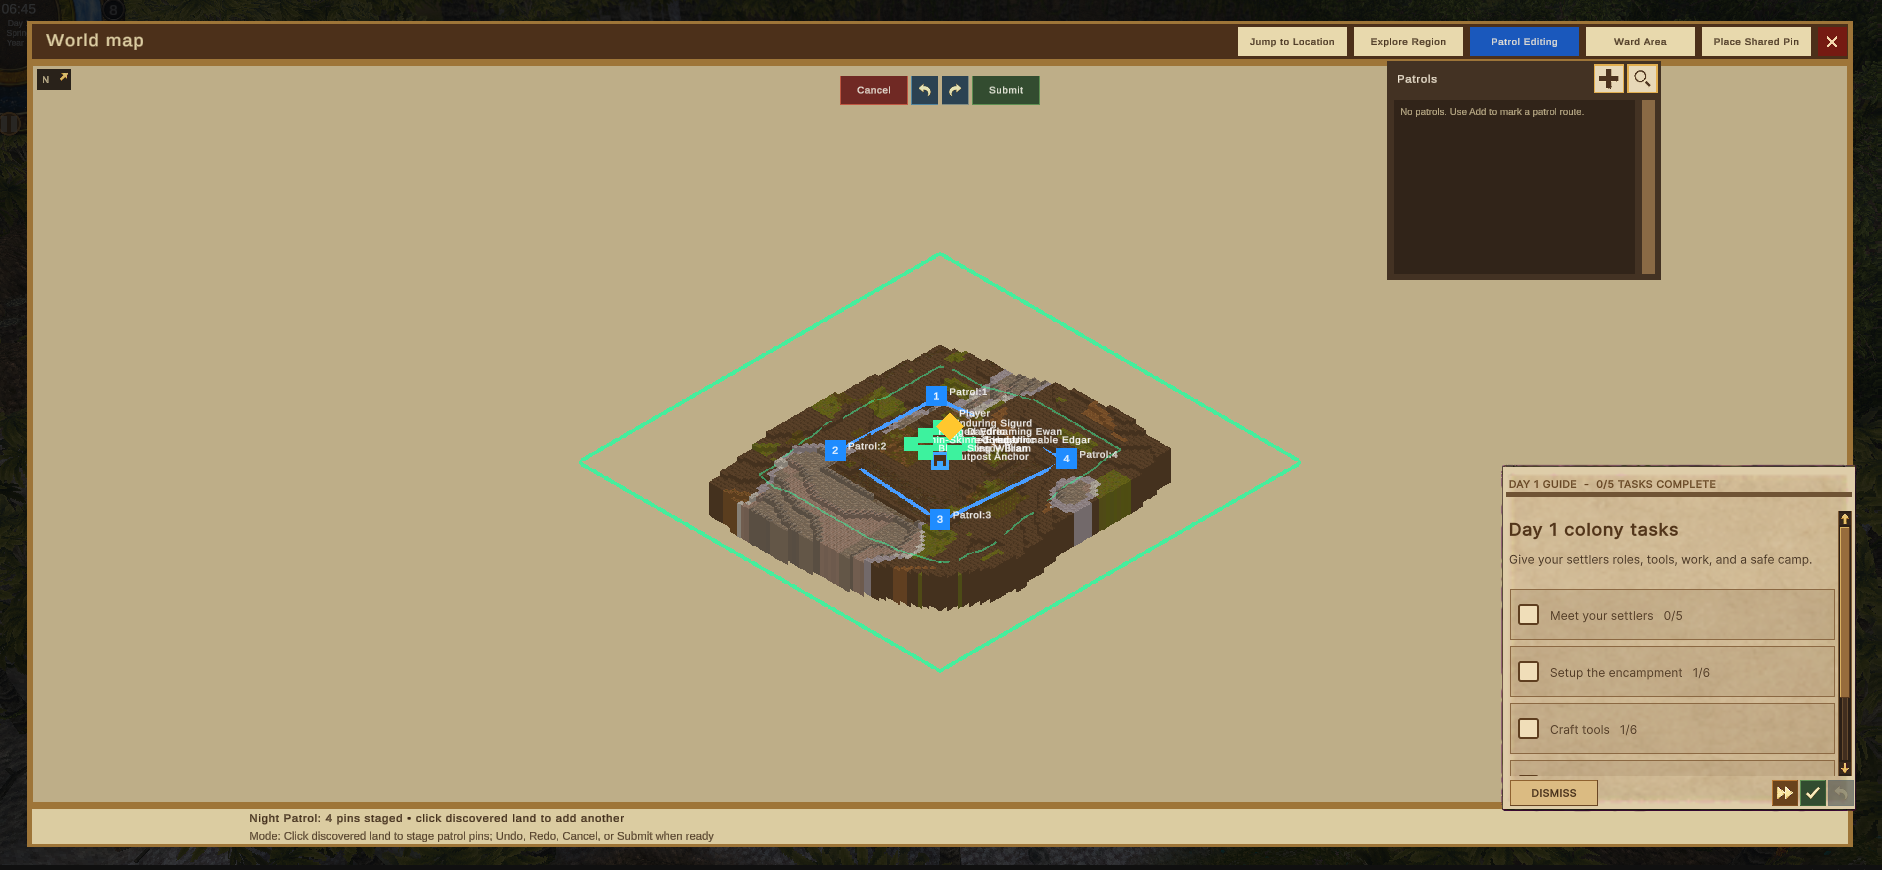
Use Undo, Redo, or Cancel to adjust the staged selection, then press the map's green Submit button to send it. Seeing blue pins and a route preview does not mean it has been submitted: the pictured Patrols list still says there are no patrols. Check the list and the guide after submitting.
Keep an eye on warnings and your settlers as evening approaches. Training, patrol placement, and the colony's response setting are all part of preparing the camp; placing a dummy alone does not finish the defense setup.
7. Build from a working camp🔗
Once the opening jobs are moving, work toward your first housing, workshop, and farming using the demo's available guidance and recipes. Keep the first construction project small enough to supply and finish.
Open Build → Construct for structural construction and Production → Workshops for workshop placement. Review material requirements, submit the plan, and let your settlers carry out the work. If you bring in a blueprint designed in Sandbox, placing it in Survival also creates a construction plan for your settlers to build.
Before moving on, check:
- Your settlers have roles and useful work queued.
- Storage has been placed and gathering or hauling is progressing.
- The Wagon's first tool orders are progressing or have finished.
- Guards have training work, the night patrol has been submitted, and you have chosen an aggressiveness setting.
- Your next construction project has reachable materials and room for settlers to work.
Continue through the remaining Survival days at your own pace, or try a separate Sandbox world for unlimited building time.
If something is not moving🔗
First check whether time is paused and whether you submitted the order. Then inspect the affected settler, work site, or production order: look for missing materials, an unsuitable role, blocked access, or another job taking priority. Queue a small job and watch it through before expanding the workload.
For a demo bug, include your build version, what you were trying to do, the steps that reproduce it, and a screenshot or short clip in the Steam demo bug thread.